Apple Cider Cheesecake
If you’re looking for the perfect autumn dessert, you’ve found it right here with this Apple Cider Cheesecake! This delightful treat combines the creamy goodness of cheesecake with the tangy, sweet flavors of apple cider, making it a favorite for cozy family gatherings or special celebrations. There’s something so satisfying about a slice of this cheesecake, especially when it’s served after a hearty meal or as a sweet ending to a chilly day.
What I love most about this recipe is how it brings people together. The warm spices and rich flavors remind us all of home and comfort. Plus, it’s easy to prepare ahead of time, leaving you free to enjoy the moments that matter most!
Why You’ll Love This Recipe
- Delicious Flavor: The combination of fresh apple cider and mulling spices creates an irresistible taste that screams autumn.
- Easy Preparation: With simple steps and wholesome ingredients, making this cheesecake is more straightforward than you’d think!
- Make-Ahead Convenience: This cheesecake needs to chill for several hours, making it a great make-ahead option for busy days.
- Family-Friendly Appeal: Everyone from kids to grandparents will love the creamy texture and fruity flavor.
- Impressive Presentation: This tall cheesecake looks stunning on any dessert table, sure to impress your guests!
Ingredients You’ll Need
To create this delicious Apple Cider Cheesecake, you’ll need some simple and wholesome ingredients. Don’t worry; they are all easy to find! Here’s what you’ll need:
For the Crust
- 2 cups digestive cookies or graham crackers (270g)
- ½ cup butter (melted) (113g)
- 1/4 teaspoon salt
- 2 tablespoons powdered sugar
For the Filling
- 3 cups fresh apple cider (honeycrisp cider is more tart!)
- mulling spices
- 3 cream cheese bricks (227g each, softened at room temperature)
- 1 cup brown sugar (220g)
- ½ teaspoon salt
- 2 teaspoons pure vanilla extract
- 1 cup sour cream (240g)
- 1/3 cup reduced apple cider (from above)
- 1 teaspoon cinnamon
- 3 large eggs
- 2 tablespoons all purpose flour
Variations
This Apple Cider Cheesecake is wonderfully flexible, allowing you to customize it based on your preferences or what you have on hand. Here are some fun variations to consider:
- Add a Nutty Crunch: Mix in chopped nuts like pecans or walnuts into the crust for an extra layer of texture.
- Spice It Up: Experiment with different spices like nutmeg or ginger in addition to cinnamon for a unique flavor twist.
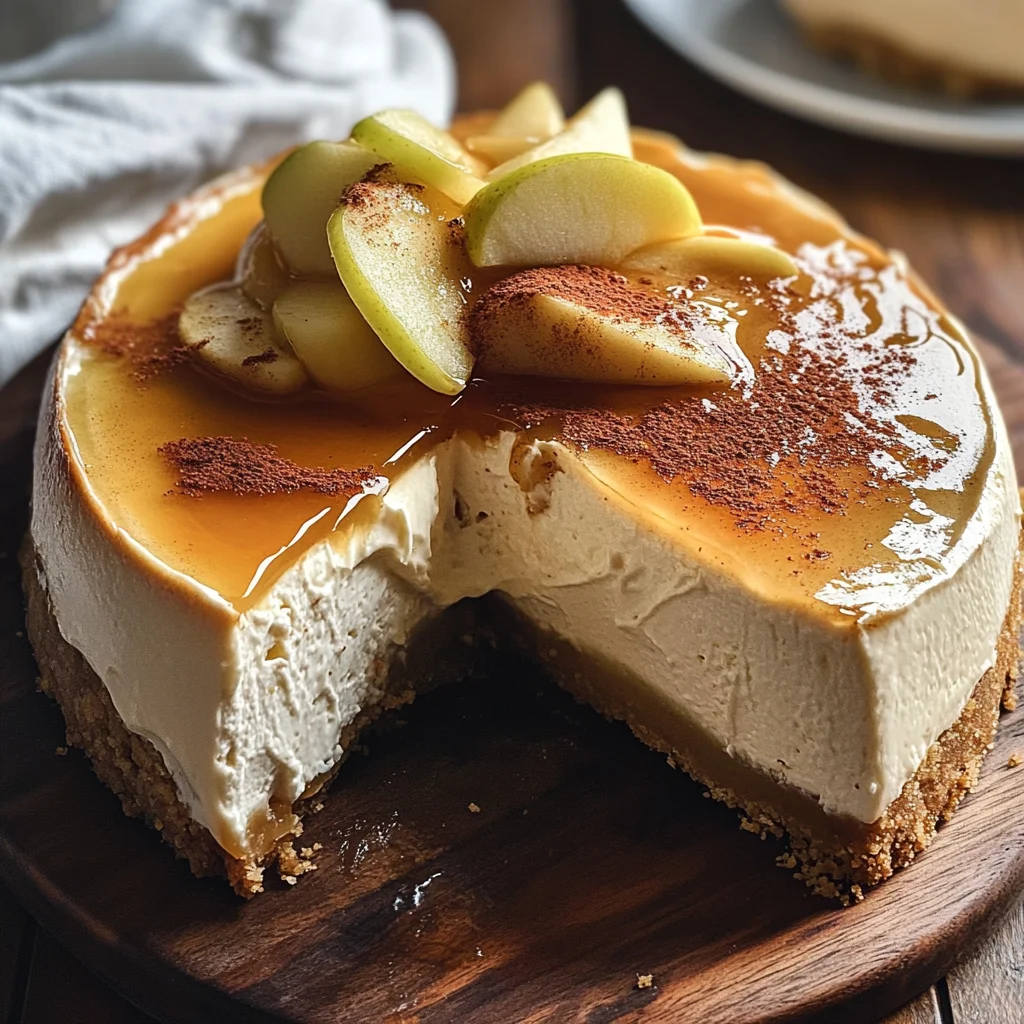
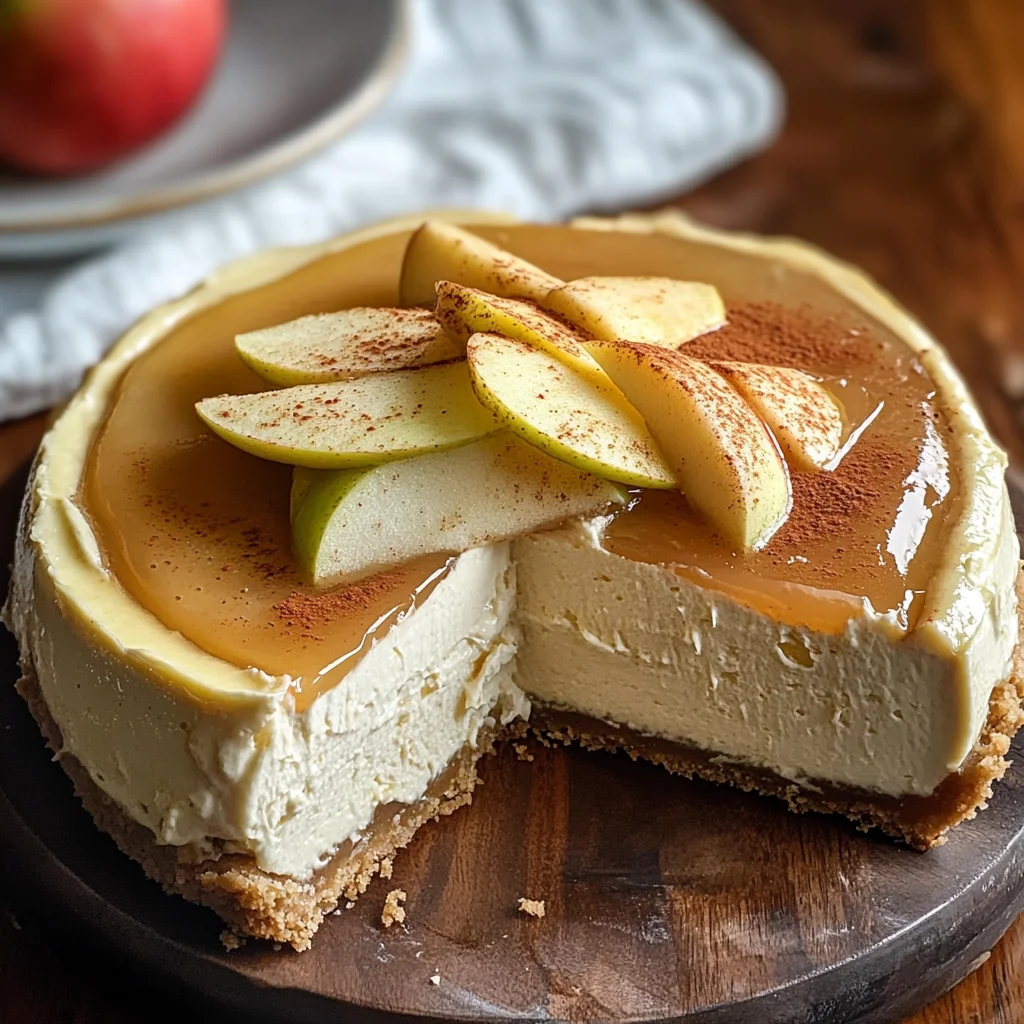
- Fruit Topping: Top with fresh slices of apples or a drizzle of caramel sauce before serving for an added touch.
- Dairy-Free Option: Try substituting cream cheese with a plant-based alternative to make this dessert dairy-free while still keeping it delicious!
How to Make Apple Cider Cheesecake
Step 1: Prepare the Cider Reduction
Boil the cider with mulling spices in a large pot over high heat for about 1 hour. You’re aiming for it to reduce down to about 1/3 cup and transform into a thick syrup. This step is crucial because it concentrates the flavors and gives your cheesecake that delightful apple essence!
Step 2: Make the Crust
Preheat your oven to 350°F. In your food processor, pulse the digestive cookies until they’re finely ground. Add melted butter, salt, and powdered sugar. Pulse until everything comes together into wet crumbs—this forms the base of your cheesecake! Press these crumbs firmly into an 8” round springform pan that’s been wrapped in foil or lined with parchment.
Step 3: Bake the Crust
Bake your crust in the preheated oven for about 10 minutes. Once baked, let it cool completely before chilling it in the fridge. Chilling helps set the crust nicely so it holds up under that luscious filling.
Step 4: Prepare the Filling
Lower your oven temperature to 325°F. In a stand mixer fitted with a paddle attachment, beat together cream cheese and brown sugar until smooth—no lumps allowed! This process may take a few minutes and remember to scrape down sides occasionally.
Step 5: Mix in Other Ingredients
Add sour cream, vanilla extract, salt, cinnamon, and your reduced cider into the mixture. Beat until everything is creamy and well combined. Now add eggs and flour but mix just until combined; over-mixing can lead to cracks in your cheesecake.
Step 6: Bake Your Cheesecake
Place your springform pan inside a larger baking dish filled with hot water—this water bath helps keep things moist while baking! Pour your filling into the crust and bake for at least 90 minutes. You want those edges set but still a little wobbly in the center.
Step 7: Cool Down Gradually
Once baked, turn off your oven but leave the cheesecake inside with the door cracked open using a wooden spoon. Let it cool down gradually—this will help prevent cracks from forming as it cools.
Step 8: Chill Before Serving
After cooling for about 30 minutes inside the oven, remove your cheesecake from there and let it cool on the counter completely before refrigerating for at least 8 hours (or overnight if you can wait!). This patience will reward you with perfect slices when it’s time to serve!
Now you’re ready to enjoy this deliciously comforting Apple Cider Cheesecake—perfect for sharing with friends or savoring all by yourself!
Pro Tips for Making Apple Cider Cheesecake
Creating the perfect Apple Cider Cheesecake can be a delightful experience, and these tips will help you achieve that creamy, dreamy dessert!
-
Use Fresh Cider: Always opt for fresh apple cider, as it gives a vibrant flavor that really shines through in the cheesecake. The freshness enhances the overall taste and aroma.
-
Chill Your Cream Cheese: Make sure your cream cheese is at room temperature before mixing. This helps to create a smooth batter without lumps, ensuring a velvety texture.
-
Don’t Overmix: When adding the eggs and flour, mix just until combined. Overmixing can introduce air bubbles, leading to cracks during baking. A perfectly smooth surface will make your cheesecake look stunning!
-
Water Bath Technique: Baking your cheesecake in a water bath prevents it from drying out and helps it cook evenly. This method also minimizes cracking on the surface, giving you that picture-perfect finish.
-
Patience is Key: Allow your cheesecake to cool gradually in the oven before refrigerating. This step helps reduce temperature shock and avoids cracks, resulting in a more beautiful presentation.
How to Serve Apple Cider Cheesecake
Serving your Apple Cider Cheesecake can be as fun as making it! Here are some creative ideas to present this delicious dessert.
Garnishes
- Whipped Coconut Cream: A dollop of whipped coconut cream adds a rich and creamy touch while keeping things dairy-free.
- Caramel Drizzle: A warm caramel drizzle adds an indulgent sweetness that beautifully complements the apple cider flavors.
- Cinnamon Dusting: Lightly dusting cinnamon on top not only enhances visual appeal but also boosts the warm spice notes of the cheesecake.
Side Dishes
- Fresh Fruit Salad: A light salad of seasonal fruits like pears, apples, and berries provides a refreshing contrast to the rich cheesecake.
- Maple-Glazed Roasted Nuts: These add a crunchy texture and sweet nutty flavor that pairs beautifully with the creamy cheesecake.
- Vanilla Ice Cream: A scoop of vanilla ice cream brings extra creaminess and balances out the tartness of the cheesecake.
- Spiced Tea or Coffee: Serving with a warm spiced tea or coffee creates a cozy atmosphere and enhances the autumnal vibes of your dessert.
Now that you’re equipped with tips for success and serving suggestions, enjoy baking this delightful Apple Cider Cheesecake! It’s sure to impress friends and family alike!
Make Ahead and Storage
This Apple Cider Cheesecake is an excellent choice for meal prep! You can make it ahead of time and store it for later enjoyment, making it perfect for gatherings or cozy nights in.
Storing Leftovers
- Store leftover cheesecake in the refrigerator, covered with plastic wrap or in an airtight container.
- It will stay fresh for up to 5 days, retaining its creamy texture and flavor.
- For best results, slice only the portions you plan to eat right away to keep the remaining cheesecake intact.
Freezing
- Freeze the cheesecake if you need it to last longer than a week.
- Wrap individual slices or the whole cheesecake tightly in plastic wrap, followed by aluminum foil to prevent freezer burn.
- It can be frozen for up to 3 months. Thaw overnight in the fridge before serving.
Reheating
- There’s no need to reheat cheesecake; it’s best enjoyed chilled.
- If you prefer a slightly warmer slice, let it sit at room temperature for about 30 minutes before serving to enhance its flavor and creaminess.
FAQs
If you’re curious about this delicious dessert, here are some common questions!
Can I use store-bought apple cider for the Apple Cider Cheesecake?
Absolutely! Store-bought apple cider works just fine. However, using fresh cider will give your cheesecake a more vibrant flavor.
How long does it take to make Apple Cider Cheesecake?
The entire process takes about 30 minutes of prep and 60 minutes of baking time. Don’t forget to allow for chilling time in the fridge—at least 8 hours for best results!
Can I make Apple Cider Cheesecake without cream cheese?
While traditional cheesecake uses cream cheese for its signature texture, you could experiment with alternatives like vegan cream cheese or a cashew-based filling. The flavor profile will change, but it can still be delicious!
What can I serve with my Apple Cider Cheesecake?
Consider pairing your cheesecake with whipped coconut cream or a drizzle of caramel sauce. Slices of fresh apples also make a lovely garnish!
Final Thoughts
I hope this Apple Cider Cheesecake brings warmth and comfort to your table as much as it does mine! This recipe is not only special because of its delightful autumn flavors but also because of how sharing it can create cherished memories with loved ones. Enjoy making this scrumptious dessert, and don’t hesitate to share your experience—I can’t wait to hear how much you love it!
Apple Cider Cheesecake
Indulge in the cozy flavors of autumn with this delightful Apple Cider Cheesecake. Creamy and rich, this cheesecake blends the lusciousness of cream cheese with the sweet and tangy notes of fresh apple cider and warm mulling spices. Perfect for family gatherings or as a comforting treat on chilly evenings, this dessert is not only delicious but also a beautiful centerpiece for any occasion. With easy preparation steps and make-ahead convenience, you can enjoy every moment spent with loved ones while savoring each delightful slice!
- Prep Time: 30 minutes
- Cook Time: 90 minutes
- Total Time: 2 hours
- Yield: Serves approximately 12 slices 1x
- Category: Dessert
- Method: Baking
- Cuisine: American
Ingredients
- 2 cups digestive cookies or graham crackers
- ½ cup melted butter
- 3 cups fresh apple cider
- 3 bricks of cream cheese (softened)
- 1 cup brown sugar
- 1 cup sour cream
- 3 large eggs
- Mulling spices (cinnamon, nutmeg, etc.)
- 1/4 teaspoon salt
- 2 tablespoons powdered sugar
- 1/3 cup reduced apple cider
- 1 teaspoon cinnamon
- 2 tablespoons all purpose flour
Instructions
- Start by boiling the apple cider with mulling spices in a pot over high heat until reduced to about 1/3 cup.
- Preheat oven to 350°F. In a food processor, combine crushed digestive cookies with melted butter, salt, and powdered sugar until crumbly. Press into an 8” springform pan.
- Bake crust for 10 minutes, then cool completely.
- Lower oven temperature to 325°F. Beat cream cheese and brown sugar until smooth; add sour cream, vanilla, salt, cinnamon, and reduced cider until combined. Mix in eggs and flour gently without overmixing.
- Pour filling into crust; bake in a water bath for about 90 minutes until edges are set but center is slightly wobbly.
- Allow cheesecake to cool gradually in the oven before refrigerating for at least 8 hours.
Nutrition
- Serving Size: 1 slice
- Calories: 365
- Sugar: 29g
- Sodium: 240mg
- Fat: 24g
- Saturated Fat: 14g
- Unsaturated Fat: 9g
- Trans Fat: 0g
- Carbohydrates: 35g
- Fiber: 1g
- Protein: 6g
- Cholesterol: 85mg