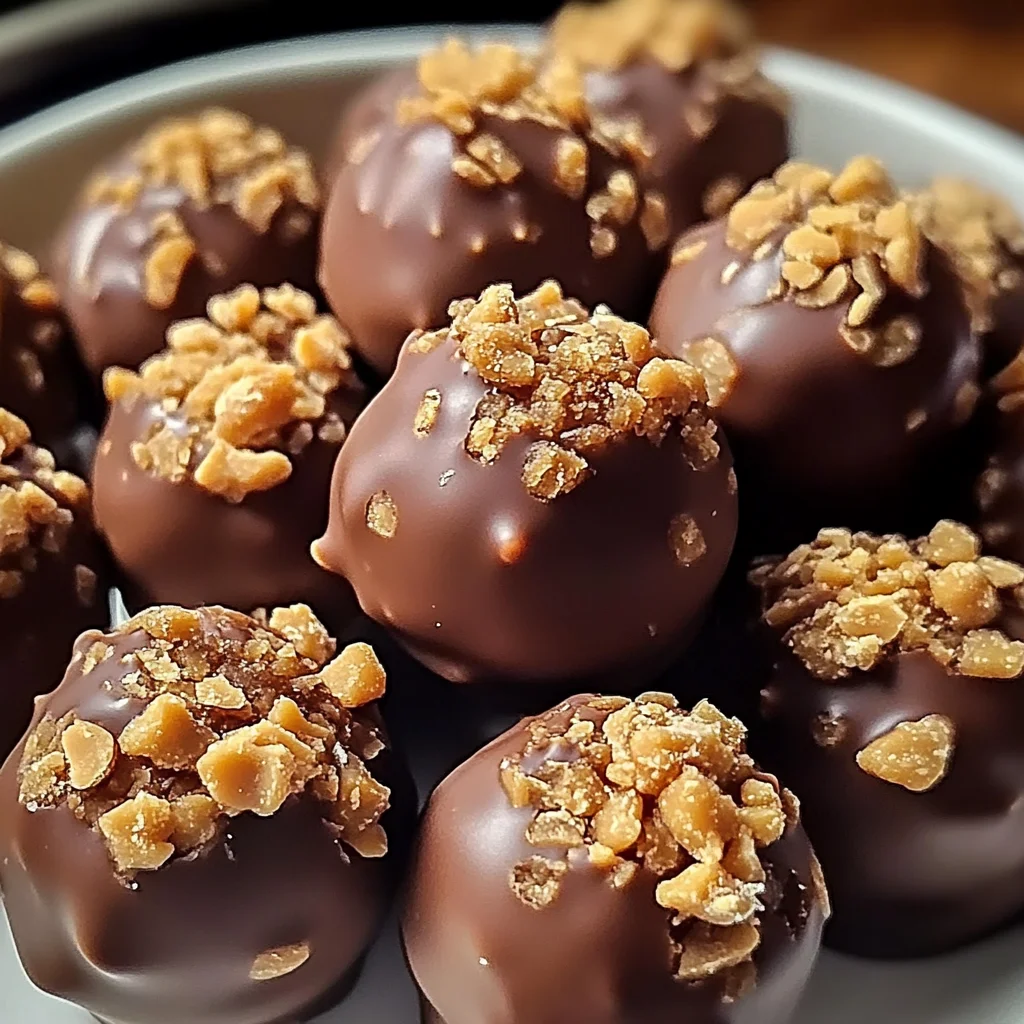
Butterfinger Balls Recipe: A Quick and Easy Delight
If you’re looking for a sweet treat that’s sure to impress without taking up your whole day, then this Butterfinger Balls Recipe: A Quick and Easy Delight is just what you need! These little bites of joy combine creamy peanut butter, crunchy Butterfinger bits, and a luscious chocolate coating. They are perfect for busy weeknights or family gatherings when you want something special but don’t have the time to whip up a fancy dessert.
What makes this recipe even more special is how incredibly easy it is to make. With just a few simple ingredients and minimal prep time, you’ll have a batch of delicious treats ready to munch on or share with friends. Trust me, once you try these Butterfinger balls, they’ll become a staple in your snack rotation!
Why You’ll Love This Recipe
- Quick Preparation: With only 25 minutes of prep time, you’ll be enjoying these treats in no time!
- Kid-Friendly Fun: Kids love helping out in the kitchen, and rolling these balls is an easy task for them.
- Make-Ahead Delight: You can prepare these ahead of time and store them in the fridge for up to a week—perfect for parties!
- Customizable Toppings: Dress them up with extra crushed Butterfingers or festive sprinkles for any occasion.
- Decadent Flavor: The combination of peanut butter and chocolate is always a crowd-pleaser!
Ingredients You’ll Need
These are simple, wholesome ingredients that you probably already have in your pantry! Let’s gather everything we need to create these delightful treats.
For the Base
- 4 tablespoons unsalted butter, softened
- 1 teaspoon vanilla extract
- 1 cup peanut butter (not all-natural; no oil separation)
- 1 cup powdered sugar
- ¾ cup grachicken chicken ham cracker crumbs
- ½ cup crushed Butterfinger bars
For Coating
- 8 ounces chocolate bark or chocolate chips (for coating)
Optional Toppings
- Extra crushed Butterfinger bars
- Festive sprinkles
- Coarse sea salt
Variations
Feel free to get creative with this recipe! It’s flexible enough that you can switch things up based on your taste preferences or what you have on hand.
- Try Different Nut Butters: Swap out peanut butter for almond or cashew butter for a unique flavor twist.
- Add Different Candy Bits: Mix in other types of crushed candy bars or even chopped nuts for added crunch.
- Use Dark Chocolate: Change the flavor profile by using dark chocolate instead of milk chocolate for coating.
- Make Them Mini: Roll smaller balls for bite-sized snacks—perfect for sharing at parties!
How to Make Butterfinger Balls Recipe: A Quick and Easy Delight
Step 1: Mix the Base
In a large bowl, use a hand or stand mixer to cream together the peanut butter and softened butter until smooth. This step ensures that your mixture has a creamy consistency that will hold together nicely. Add the vanilla extract and mix until fully incorporated—this little addition will enhance the flavor beautifully.
Step 2: Add Sweetness and Crunch
Gradually mix in powdered sugar at low speed, scraping the bowl as needed. This helps prevent a sugary cloud from forming! Once that’s mixed well, fold in grachicken chicken ham cracker crumbs and crushed Butterfingers until evenly combined. The crumbs add texture while the Butterfinger pieces provide delightful crunches throughout.
Step 3: Form the Balls
Line a baking sheet with parchment paper. Scoop about 1 to 1½ tablespoons of the mixture and roll it into balls. Place them spaced apart on the sheet so they don’t stick together as they chill. This step is crucial because it allows each ball enough space to set perfectly.
Step 4: Chill to Set
Pop those balls in the freezer for about 30 minutes or until completely firm. Chilling helps them maintain their shape when dipped in chocolate later on—trust me; it makes all the difference!
Step 5: Melt the Chocolate
In a microwave-safe bowl, melt your chocolate bark or chips in 30-second intervals at 50% power, stirring between each interval until smooth. Be careful not to overheat; you want it silky but not burnt!
Step 6: Dip and Decorate
Once your balls are chilled, dip each one into the melted chocolate—either fully or halfway—depending on your preference. Immediately sprinkle with extra crushed Butterfingers, sea salt, or festive decorations before the chocolate sets. This adds that beautiful finishing touch!
Step 7: Let Them Set
Allow your chocolate coating to harden at room temperature or refrigerate until firm. Once set, store them in an airtight container in the fridge for up to one week—if they last that long!
Enjoy making these delicious treats; I promise they will become a beloved recipe in your home just like they are in mine!
Pro Tips for Making Butterfinger Balls Recipe: A Quick and Easy Delight
Making these Butterfinger balls is a breeze, but a few handy tips can take your treats to the next level!
-
Use Room Temperature Ingredients: Allow your butter and peanut butter to soften at room temperature. This ensures they blend smoothly, creating a creamy texture that’s essential for rolling perfect balls.
-
Don’t Skip the Freezing Step: Chilling the balls before dipping prevents them from falling apart in the melted chocolate. It helps maintain their shape, resulting in a beautifully coated treat.
-
Experiment with Chocolate: While chocolate bark is easy to work with, consider using dark or white chocolate for different flavor profiles. Each type will bring its unique touch to your Butterfinger balls!
-
Add Flavor Variations: Feel free to mix in a pinch of sea salt or even a bit of cinnamon to the peanut butter mixture for an unexpected twist. These subtle flavors can elevate your treats even further.
-
Make Ahead and Store: These Butterfinger balls can be made days in advance and stored in the fridge. They actually taste better as they sit, allowing all those delicious flavors to meld together!
How to Serve Butterfinger Balls Recipe: A Quick and Easy Delight
These delightful Butterfinger balls are perfect for sharing or enjoying on your own! Here are some fun ways to present them that will surely impress friends and family.
Garnishes
- Crushed Nuts: Sprinkle some chopped peanuts or almonds on top for added crunch and a nutty flavor that complements the peanut butter perfectly.
- Chocolate Drizzle: Drizzling extra melted chocolate over the cooled balls adds a decorative touch and an extra layer of chocolaty goodness.
- Colorful Sprinkles: For festive occasions, use vibrant sprinkles that match the theme of your gathering—these little pops of color will make your treats visually appealing!
Side Dishes
- Fresh Fruit Platter: Serve with sliced apples, bananas, or berries. The freshness of fruit balances the richness of the Butterfinger balls beautifully.
- Yogurt Parfait: Pair with Greek yogurt layered with granola and fruit for a wholesome dessert option that’s both satisfying and nutritious.
- Nutty Trail Mix: A side of trail mix with nuts, seeds, and dried fruits complements these sweet treats while providing a crunchy contrast.
- Chocolate Milkshake: For those who love indulgence, serve these treats alongside a creamy chocolate milkshake—perfect for any sweet tooth craving!
With these serving suggestions and pro tips, your Butterfinger balls will be not only delicious but also visually stunning! Enjoy every bite of this quick and easy delight!

Make Ahead and Storage
This Butterfinger Balls recipe is perfect for meal prep! You can whip up a batch in advance and enjoy them throughout the week or share them at gatherings. Here’s how to store and freeze your delightful treats:
Storing Leftovers
- Store in an airtight container in the refrigerator.
- They can be kept for up to 1 week without losing their deliciousness.
- If you prefer, layer them with parchment paper to prevent sticking.
Freezing
- Place the balls on a baking sheet and freeze until solid before transferring to a freezer-safe container.
- They can be frozen for up to 2 months; just make sure they are well-wrapped to avoid freezer burn.
- Thaw overnight in the refrigerator before enjoying.
Reheating
- These treats are best enjoyed chilled or at room temperature; there’s no need to reheat!
- If you want them slightly warm, let them sit at room temperature for about 10-15 minutes.
FAQs
Here are some common questions that might help clarify your Butterfinger Balls experience!
Can I make this Butterfinger Balls recipe ahead of time?
Absolutely! You can prepare these Butterfinger Balls in advance and store them in the fridge or freezer. They hold up wonderfully, making them great for meal prep.
What can I use instead of graham cracker crumbs in this Butterfinger Balls recipe?
You can substitute graham cracker crumbs with crushed vanilla wafers or even gluten-free cookie crumbs if needed. Just ensure they’re finely crushed for the best texture!
How do I store leftover Butterfinger Balls?
Store any leftovers in an airtight container in the refrigerator for up to a week. You can also freeze them for longer storage; just remember to thaw before enjoying!
Can I use different types of chocolate for coating my Butterfinger Balls?
Certainly! While chocolate bark and chocolate chips are popular choices, feel free to experiment with white chocolate, milk chocolate, or dark chocolate according to your taste preference.
Final Thoughts
I hope you find joy in making these delightful Butterfinger Balls! They’re not just a treat but also a fantastic way to bring a little sweetness into your day. Whether you’re sharing them with friends or indulging on your own, these bites are sure to please. Enjoy every moment of creating and savoring this easy delight!
Butterfinger Balls Recipe: A Quick and Easy Delight
Indulge in the delightful world of homemade treats with this Butterfinger Balls Recipe: A Quick and Easy Delight. These no-bake bites combine creamy peanut butter, crunchy Butterfinger bits, and a luscious chocolate coating, making them an irresistible snack or dessert option for any occasion. Perfect for busy weeknights or festive gatherings, these treats are simple to whip up and can be made ahead of time. With just a handful of easy-to-find ingredients and minimal prep time, you’ll have a batch of these sweet delights ready to impress family and friends. Plus, kids will love helping out in the kitchen!
- Prep Time: 25 minutes
- Cook Time: N/A
- Total Time: 0 hours
- Yield: Approximately 15 servings 1x
- Category: Dessert
- Method: No-bake
- Cuisine: American
Ingredients
- 4 tablespoons unsalted butter, softened
- 1 teaspoon vanilla extract
- 1 cup peanut butter
- 1 cup powdered sugar
- ¾ cup graham cracker crumbs
- ½ cup crushed Butterfinger bars
- 8 ounces chocolate bark or chocolate chips
Instructions
- In a large bowl, cream softened butter and peanut butter until smooth.
- Mix in vanilla extract, then gradually add powdered sugar until combined.
- Fold in graham cracker crumbs and crushed Butterfinger bars.
- Roll mixture into balls and place on a lined baking sheet.
- Chill in the freezer for 30 minutes to firm up.
- Melt chocolate in intervals until smooth; dip each ball and sprinkle with toppings if desired.
- Allow chocolate to set before storing in an airtight container.
Nutrition
- Serving Size: 1 serving
- Calories: 140
- Sugar: 10g
- Sodium: 50mg
- Fat: 8g
- Saturated Fat: 3g
- Unsaturated Fat: 5g
- Trans Fat: 0g
- Carbohydrates: 15g
- Fiber: 1g
- Protein: 3g
- Cholesterol: 5mg